Email address configuration is an essential feature in the system settings because it enables reliable and effective communication with customers and internal stakeholders. By specifying the appropriate email addresses, you can ensure that emails sent to customers come from the company from which the customer made the purchase.
Designating a specific email address for customer communication allows for two-way communication, ensuring you receive and can respond to any customer questions or feedback. On the other hand, setting an email address for internal messages enables efficient internal communication, ensuring that important notifications and updates reach the relevant personnel promptly. If you don't specify a customer email address, emails are sent from orders@headq.io, meaning you won't get any customer replies. Also, you won't receive notifications of new orders or RFQs if you don't specify your internal email address. Overall, proper email address configuration is crucial in establishing seamless communication channels, fostering customer relationships, and facilitating smooth business operations.
How to set up notifications emails
- Open the system settings
- Locate the Email settings
- Click "Edit" to specify the email addresses and DNS records

- Enter the desired email addresses for customer communication and internal messages
- Save the changes
- Once saved, the system will generate DNS records for your email domain
- Access your email system administration panel or contact your system administrator
- Provide them with the generated DNS records
- Instruct your system administrator to configure the DNS records in your email system
- Once the DNS records are correctly configured, your email system will send messages from the specified email addresses
- You can now communicate with customers using the designated email address, and internal messages will be directed to the appropriate recipients
If you need assistance with the DNS record setup or have any questions, you can either copy the generated information or send it directly to your system administrator for further assistance and implementation.

Once the DNS records have been successfully configured, the status field in the settings will be updated. This status indication confirms that the DNS records have been properly set up and are functioning correctly. It verifies that messages sent from the designated email addresses will be routed correctly and ensures seamless communication with customers.

SPF & DKIM
HeadQ uses Sendgrid for all email communication.
When you complete updating the DNS records (CNAME records), automated security is enabled by default. Automated security handles your SPF and DKIM records for you.
You can learn more about this in Sendgrid's website
Editing email templates
In HeadQ, there are four different email templates that you can edit:
- Customer order confirmation
- Customer RFQ (request for quote) confirmation
- Internal order notification
- Internal RFQ notification
All of these templates can be edited in the same way. The only exception is internal emails — they are always sent in the store’s default language and do not support translations.
How to edit email templates
- Open Settings
- Locate the email templates section
- Select the template you want to edit
- Make your changes and save
Customizing the content
Each email template supports the following customizations:
- Hero image
You can add a hero image to the email. The recommended aspect ratio is 16:9. - Custom message
You can include a custom message using the built-in rich text editor. This allows you to format text, add links, and tailor the message to your customers.
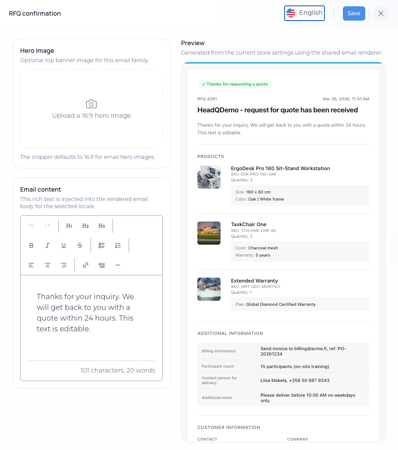
All other content in the email templates — such as product details, pricing, and customer information — is automatically generated by the system and cannot be manually edited.